Mfr Part # 3093
CRICKIT CIRCUIT PLAYGROUND EXP
Adafruit Industries LLC
License: See Original Project Circuit Playground
Guide by Dano Wall and 3 other contributors
Build your own interactive monsters, powered by Crickit!
It doesn't take exotic materials to build your own animatronic friend, just a few paper cups, craft supplies, a couple of servos, and a Circuit Playground Express with CRICKIT!
This guide shows how program these crafty monsters with both Microsoft MakeCode - a block-based programming system that's easy for anyone to use, and CircuitPython, a Python-based language that is the perfect introduction to higher-level programming.
3 x Micro Servo
1 x Micro USB cable
To build this project you'll need:
Paper cups (this set is a good size and includes many colors)
Hot glue and glue gun
Pipe cleaners for decoration
Scissors
Scrap cardboard
Optional: googly eyes for facial features, yarn for hair/fur
Here, we will use pipe cleaners to build a furry werewolf.
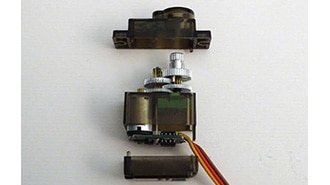
This werewolf is constructed out of three paper drinking cups with a servo motor controlling the movement.
Mark an outline of the servo on the bottom of a cup.
Cut a hole in the bottom of the cup.
Insert the servo through the hole.
Use hot glue to glue servo in place.
Attach the servo arm.
Use hot glue to stick short sections of pipe cleaner on the cup.
Add arms.
Cut a hole for the face.
WARNING! BURN HAZARD! Hot glue is very sticky and it's easy to accidentally burn your fingertips. Be careful when using it.
Use a hobby knife to cut out a mouth.
Affix googly eyes with hot glue or glue stick.
Add a nose.
Place colored paper behind the mouth.
Remove the bottom of a cup.
Fit the top cup over the bottom cup.
Place the trimmed inner cup inside top cup.
Glue a folded riser to the inner cup.
Glue a werewolf face to riser.
This vampire uses two gray paper cups to create the head and cape, and one red cup for the body.
Cut a hole for a servo motor in the bottom of a cup.
Glue the servo motor in place with hot glue.
Cut a curved section out of one cup.
This will become the vampire's cape.
You can bend the edges outward to give the cape some more shape and texture.
Cut out another cup, trimming top and bottom.
This piece will become the vampire's head.
At this stage, you can add some shape to the top edge of the head.
These three pieces will fit together as pictured.
Cut out two eyes and some fangs out of black cardboard or cardstock.
A thin black collar is a nice addition and will help hold the two cups together.
Glue these vampire features onto the head and attach the cape.
Bend two arms out of pipe cleaners.
Use a thin line of hot glue to stick the arms to the edge of the cape.
Put the head and cape on the body.
Use a square of double-sided foam tape to stick the head & cape to the servo arm.
Your vampire is ready!
This spooky ghost pairs two stacked paper cups with a piece of cloth formed around a pipe cleaner to create a ghostly hollow face.
Cut a hole for a servo motor in the bottom of one cup.
Glue the servo motor in place.
Attach the servo arm.
Find a piece of tissue paper or cloth about 12" x 12". This will become our ghost's head.
Glue a pipe cleaner diagonally down the middle.
Fold the cloth over the pipe cleaner.
Bend into a U shape.
Now take the ghostly head and fold it over the paper cup.
Use a line a hot glue on either side of the cup to hold the ends of the pipe cleaner to the cup.
Trim the ends off, if necessary.
Fashion two arms out of sections of a pipe cleaner.
Hot glue these to the sides of the ghost.
Use a square of double-sided tape to connect the ghost body to the ghost head.
Your ghost is now ready to dance!
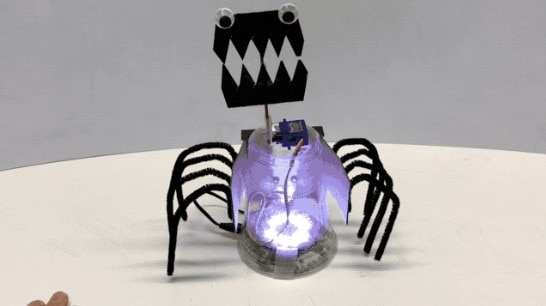
For this monster, we will use two paper cups and some pipe cleaners to create a long-legged spider.
Cut 8 small holes in a black cup.
As with previous monsters, cut a rectangular hole in the bottom of the cup and mount the servo through it.
Place eyes on inner cup.
Be careful to place them so they line up with the holes you cut!
Glue eight spidery legs onto outer cup.
Pipe cleaners work best for this, as they can be bent and trimmed to create the effect you want.
Assemble the two cups together, using a piece of double-sided foam tape to secure the inner cup to the servo motor arm.
Your spider is now ready to dance! Spoooooooky!
In this example, three paper cups, a few pipe cleaners and some markers create a cat with shifty eyes.
Draw two cat eyes on a brightly colored cup, positioning the eyes around the middle of the cup.
Cut off the top of the cup. This will sit inside the outer cup, allowing the eyes to move independently.
Cut out two eye holes in the outer cup, aligning them with the cat eyes on the inner cup.
Add two ears to the top edge of the outer cup.
Use a small line of hot glue to hold them in place.
Cut some whiskers out of pipe cleaners or yarn. Glue these in place below the eyes with dabs of hot glue.
Add a round pink nose, using rubber, pink craft paper, or a marker.
Cut the top off another cup to create a base that the head will sit in.
Draw paws on the bottom of the cup, include as much detail on the legs and body of the cat as you like.
In this example, some cardboard is attached to a paper cup to create the face of an owl, while two more cups make the moving eyes and winged body.
Cut out a faceplate in the shape of an owl's head.
Cut out two matching holes in a cup.
Add a servo motor to the base of the cup.
Place the trimmed inner cup inside.
Add googly eyes.
Googly eyes work well for this owl, creating a perpetually surprised look.
Cut a base out of another paper cup.
After the bottom has been removed, cutting a zig-zag pattern along the edge of the cup lends a feathery pattern to the animal.
Create two wings from scrap cardboard. Add feathery details with a silver sharpie.
Glue the wings to the sides of the cup.
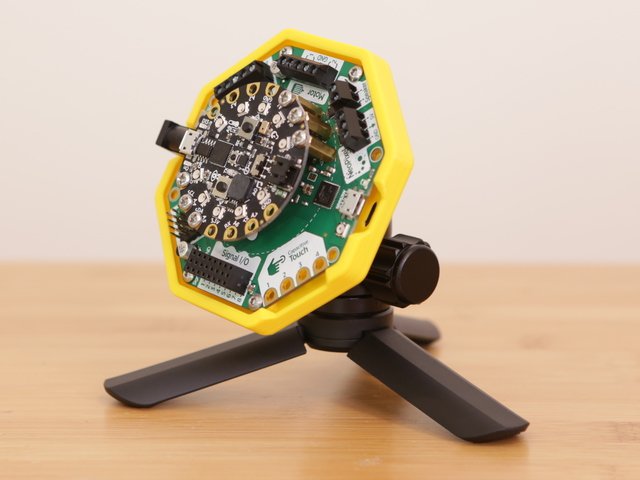
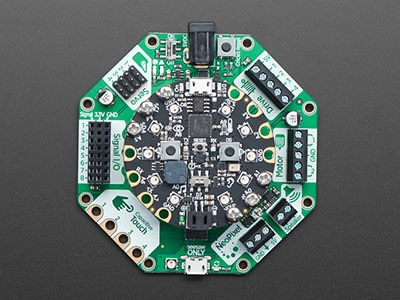
Each of the monster servos plug into the Crickit in the Servo block. Start with 1, then 2, then 3. The lightest color (white or yellow) wire faces outward, the darkest (black or brown) inward.
The Circuit Playground Express is attached to the Crickit per these instructions.
Now it's time to upload some code! For this we will be using Microsoft MakeCode for Adafruit, a web-based code editor. It provides a block editor, similar to Scratch or Code.org, and also a JavaScript editor for more advanced users.
If you haven't used MakeCode before, this guide is a good place to start.
To make your board work with MakeCode, we need to put the Circuit Playground Express into "bootloader mode". All that's required to do this is to connect the board to your computer with a micro-USB cable and click the small reset button in the center of the board.
Click this link or the button below to enter the portal to interact with the code for this project.
To upload code, connect you Circuit Playground Express to your computer using the micro-USB cable, click the Download button to download the .uf2 file to your computer, and drag 'n drop it onto the CPLAYBOOT drive using your computer's file explorer program or finder.
The drive will automatically eject itself. (Your computer may give you a "failed to eject drive correctly" error, you can ignore this.) The code is now on your Circuit Playground Express and ready to run!
If you'd like to play with this code, click Edit and a new window will open in which you can create your own version.
You can easily click and drag the block of functions around, making it simple to change what will trigger the monsters to start dancing.
You can change the sensitivity of certain triggers in the on-start block.
Settings for both the light threshold and sound threshold can be altered to make your monsters appropriately sensitive to the conditions in which you place them.
Problem: My motors aren’t responding!
Solution: Make sure that the small slide switch on the CRICKIT near the DC power connector is set to “ON”.
Problem: My Circuit Playground Express doesn’t show up as CPLAYBOOT!
Solution: Your Circuit Playground Express board comes ready to work with CircuitPython, and will show up as a flash drive named CIRCUITPY the first time it’s connected to your computer. To switch over to work with MakeCode, connect the board to your computer with a micro-USB cable and click the small reset button in the center of the board.
When Circuit Playground Express is in Bootloader mode, all the LEDs will flash red briefly, then turn green. Your computer should now show removable drive called CPLAYBOOT. Now you can copy the MakeCode file to the CPLAYBOOT flash drive.
Rather than using MakeCode, it is also possible to switch your Circuit Playground Express into CircuitPython mode with one single press of the reset button in the middle of the board.
In this example, we'll learn how to use CircuitPython to control each monster.
CircuitPython is a programming language based on Python, one of the fastest growing programming languages in the world. It is specifically designed to simplify experimenting and learning to code on low-cost microcontroller boards.
CircuitPython is easiest to use within the Mu Editor. If you haven't previously used Mu, this guide will get you started.
If you haven't used Circuit Playground Express with CRICKIT before, make sure you've updated it with the latest special 'seesaw' version of the CPX firmware. This guide will show you how.
To start, copy and paste the code below into your Mu editor.
import time
from adafruit_crickit import crickit
from adafruit_circuitplayground.express import cpx


# Create three servos on Crickit
def dance_monster1():
    crickit.servo_1.angle = 80
    time.sleep(0.100)
    crickit.servo_1.angle = 100

def dance_monster2():
    crickit.servo_2.angle = 80
    time.sleep(0.100)
    crickit.servo_2.angle = 100

def dance_monster3():
    crickit.servo_3.angle = 80
    time.sleep(0.100)
    crickit.servo_3.angle = 100

def dance_monster4():
    crickit.servo_4.angle = 80
    time.sleep(0.100)
    crickit.servo_4.angle = 100

while True:
    if cpx.light < 1000:
        dance_monster1()
    if cpx.light < 1000:
        dance_monster2()
    if cpx.shake:
        dance_monster3()
time.sleep(1.5) Make sure you've connected the Circuit Playground Express to your computer and have Mu open and connected to your board.
Once the code is copied into Mu, press the Save button - your code should be saved to the CIRCUITPY disk drive (which appears when the Circuit Playground Express is plugged into your computer) as code.py.
Problem: My Circuit Playground Express isn't recognized by Mu!
Solution: Make sure your board is set up with CircuitPython, which has the Circuit Playground Express show up as a flash drive named CIRCUITPY when you connect the CPX to your computer. If it is showing up as CPLAYBOOT on your computer, you can follow the steps in this guide to ensure CircuitPython is loaded and you see the CIRCUITPY drive.
Problem: My servo isn't moving!
Solution: Check that the switch on CRICKIT is set to "ON".
Problem: My servo still isn't moving!
Solution: Make sure you've updated your Circuit Playground Express with the latest special 'seesaw' version of the CPX firmware. This guide will show you how.
Set this trio of monsters in a darkened room and wait for someone to enter and turn on the lights. Suddenly they all spring to life!
These monsters are fun to leave somewhere like on a porch with an automatic light, so they'll start dancing whenever a guest approaches in response to the change in brightness or the sound of their approaching footsteps, depending on which trigger mechanism you prefer.